Thursday, November 29, 2012

A New Blog in Town


There's a new blog in town

My husband, Tom, started a new blog- you can view it using this link
 kd0qkk 
which is his ham radio call sign but don't expect it to focus solely on radio.
I'm certain you will see some fishing, boating, and granddaughter posts along the way.
If you get a chance pop over and give it a look.

On another note:
I've been a little slow on posting lately, with the holidays 
and still battling this sinus infection that seems to never, ever, ever go away!
I promise some posts on the family furniture that Tom has been working on 
between carpentry jobs.  We're just about ready to bring it up to Taylor's 
room here at our house.  Then I need to make some runners for the top 
so I've been scouring the internet for some free patterns and
think I will use my stash of 1930s fat quarters since the time period is right.


Monday, November 26, 2012

She Shot An Arrow in the Air


After the turkey and dressing,
After the cranberry and pie,
The games begin.

Taylor's cousin, Gabe, just got a new bow which he 
brought over Thanksgiving weekend. 
Taylor grabbed her bow and target and they
decided to practice in the side yard--
this after several games of pool.

We're wondering what to get Taylor for Christmas.
She has a bow, a fishing pole, a BB gun and targets.
She really loves pool- a shark if I ever saw one!
We're thinking about a Taylor sized pool cue, 
maybe personalized.

I hope everyone had a wonderful Thanksgiving weekend.
What do you all do after the Thanksgiving meal?


Saturday, November 24, 2012

Crazy Port Wine Cajun Chicken Strips


My husband is an instigator!
Brother-in-law, Dan, made some great chicken strips
coated with Tony Chachere's  seasoning along with 
a "blooming onion" type dip- tangy and creamy.
He also brought some port wine cheese and crackers.


My husband decided to spread the port wine cheese
on the chicken strips.
Then, convinced my nephew to try it!
I think we may have stumbled onto something here 
Port Wine Cajun Chicken Strips- LOL!
Crazy husband.

Friday, November 23, 2012

Hip Hip Horray! It worked!!!!!!


My photos are TOO BIG for my free Picasa account.
Now I know what to do, boy I guess they were huge.  
I hope I didn't slow you all down with how big they were.

So thank you both (from my previous post) so much for helping me!
Now, another question . . . . 
Has anyone ever had their blog published in a personal book form?
I would LOVE to have this but not sure who is reputable.

Again, thank you so much!

HELP PLEASE-

HELP NEEDED PLEASE   Blogger photo uploads said my Picasa Account is full?  What is this/
It wants me to pay to upload photos?
Where is my picasa account?
What happens if I delete old photos? Do they fall off my blog?

Is my blogging over?


Tuesday, November 20, 2012

Mementos - Saving the Family Furniture


There is no telling when you will find the sweetest things, 
mementos tucked away for decades in the back of a drawer.
My husband discovered these as he started to refinish the furniture
we brought back from my grandmother's old house.  

These pretty little Valentines for the Teacher 
must have been given to my aunt years ago by her favorite pupils.


And two purses:  little leather bear and what appears to be an Indian rider 
on the Nisswa, MN coin purse.


 A tin containing a Templeman (family  name)  beaded bracelet, 
a small metal heart, and other trinkets.


A plastic ring box and reed for a flute (????)


An old prescription bottle for 
Motion Sickness still filled with medication
plus
and an unspecified remedy, both most likely from
from my grandfather's old Rexall pharmacy.


A baby announcement and the inside of the ring box.


A church bulletin from June 19, 1955
The First Christian Church in Trenton, MO.
not too far from her home in Bethany, MO
Funny, June 19th  is my birthday but this is four years earlier.
What a coincidence.


The bulletin cover.

Inside it reads
The Organ Prelude is a Veil dropped between every day life and the Sanctuary.  In crossing the threshold  the music should separate the world without from the world within.  If you must whisper, let it be into the ear of your Heavenly Father.

How I love to discover these treasures from the past.

I'll be posting on the furniture refinishing in the coming days.  
I'm pretty excited to finally get this furniture back into working order.
There's nothing new and modern that can take the place.


Sunday, November 18, 2012

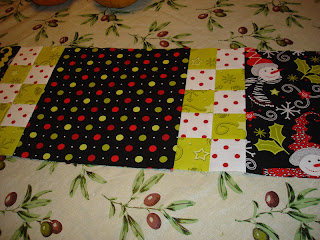
Table Runner - Snowmen Under Construction


It'll be a Merry Christmas with this little table runner, 
coupled with some retro lounge music and a nice beverage!
I've pieced it so it's time to select the backing 
and see what I can do about quilting.


I started with some simple strips
constructed from fat quarters.
Not all had selvages but I believe they are by
Lazy Daisy- I found a link here so you
can see The Collection 


Some started with the white/red print
others with the green first
Then you cut them in 2 1/2 inch pieces
so each column has both colors.
You'll have some left over too.


Then you flank the snowman print with two rows of  multi colored squares.
At that point you can have 2 place mats.
OR
add one more row of white/green in between the two mats for a runner.
I needed my runner to be longer so I added dot material in the center.


I always have a centerpiece and that would hide the center of my runner.
I've got some table cloths that will coordinate with this 
in the dining room.


So you have the "mat" portion on each side of the dots.


That way I won't lose my center.


I can place a centerpiece right here.


You can see how it would look as a place mat too
if you had only a center with the strips on each side.


Then I'll bind it with this red/white dot
after I select my backing
and quilting design.


My pattern was called Checkered Past,  image here.
This photo is not the pattern but I as I was cutting and placing pieces aside, 
I thought how pretty it might be with the novelty print on point
surrounded by stripes and dots in the corners.
I'm not good enough to make up this pattern but 
I think it would make a nice table topper.
I better get busy, time is running short!

Linking to

Saturday, November 17, 2012

Erecting the Antenna - Ham Radio


The Mast
The antenna is connected here. 
The radio signal goes into the copper wire.
The black thick line is called a ladder line.
It carries the signal from the antenna to the radio.
It sits on top of the mast which will be 50 ft in the air,
Currently it is only half that height since I can't hold it by myself.
Wire ties hold it in place so it won't flap around in the breeze.
In super simple terms, this will connect to a balun, to a coax cable and then to the radio.


We laid the mast down, attached the guy lines to hold it in place
then we stood it up and I held it in place while he prepared the lines.
  The guy lines are stretched out about 50-60 ft. This is temporary.  
As the mast gets taller, the lines don't have to be spread out so far.


Carrying equipment.


An idea of the current height.
You may have to click to enlarge the photo.


Guy lines.


Stretching out the lines.


The house sits up high, about 10-12 ft lower than the basement floor.
The roof is about 40 feet from the ground so 
when the antenna eventually reaches 50 ft
you won't be able to see it above the roof line.


Antenna and guy lines attached.
The antenna lines are the two attached to the 
black line, the guy lines are the three others.


Tying off the antenna lines.
They also require guy lines because you can't tie
them directly to a tree.


Antenna
The ceramic  insulator gives you something
to tie to that is non-conductive.


Thursday, November 15, 2012

Fabric Finds


My block of the month quilting class always has something to feature
and this fabric really caught my eye.  I love the different look, 
not just green and red but black of all colors!
The sample was actually more like the pattern below, 
just a bit different but that pattern was gone so 
I selected a table runner that can also be changed into place mats.
I like the snowmen for the large print, 
the green tone on tone plus the white with red dots for the checkered portion
and maybe the large dots for the binding.
Otherwise there is a red with white dots available.
I love the big dots but you may not be able to see much of them.


This fat quarter selection is part of a grouping, 
except for the green flowered half yard in back.
I also picked up another little pattern card.
I don't think I'll use these for it but you never know.
I'm a little worried about getting the squares in line on the log cabin portion.


This is the last owl fat quarter.
Plus the optional binding material for the 
snowman table runner/placemats.
Then I liked the flowered pattern because it could 
coordinate with another fabric I have.


This is lovely, I wish you all could see it in real life.
It's a batik with birds and flowers, sort of green/gray/blue background-
really beautiful.  There is a lot of coordinating fabric 
but I don't know what I'd make.
I just fell in love with the birds so had to get at least a fat quarter.

Most of these fabrics don't have a printed selvage.
Nothing on these birds either- I have to figure this one out.
The snowman print is S'Noel by Dana Brooks for Lazy Daisey.
Green on green by the snowmen - Snow by Alice Kennedy Lazy Daisy Cottage for Henry Glass
Owl- Timeless Treasures
Green half yard (also on my owl pillow) is Bliss by Moda.

Linking to Deborah Jean's Dandelion House Farmgirl Friday Blog Hop


Wednesday, November 14, 2012

Little Owl Pillow


I'm working on something for someone special.
Someone who loves owls
It's made with 5 fat quarters
and one 14 x 14 pillow form
I hope she doesn't read the blog!


There is a free pattern
at Fat Quarter Shop 
It's super easy and requires no quilting
The on line version has a chicken theme
so chicken lovers, take a look. 
There are LOTS of free patterns here for downloading.


This is one of the two
but I have to add the pillow
and sew the bottom
I like the little owls center piece better,
this one with the larger owls looks
a little out of balance.
They don't line up straight.


I used the center block as the backing
so she can turn it around and have 
something different if she wants to 


I didn't have another fat quarter of the owl pattern
to complete the backing,
so I stopped at the quilt shop in Eureka.
She had 1 fat quarter left.
No yardage left at all.
Lucky me!

I sort of picked up some other things too.
You knew I would!
More on that tomorrow.

Linking to White Wolf Summit Farmgirl 

Monday, November 12, 2012

Let the Sparks Fly- Making a Burn Barrel


There were sparks flying high this weekend 
as my husband made a new burn barrel for us. 
Our Helpful Neighbor Rick was right by his side,
There's not much these two are unable to do if given enough time and equipment.
Guy fun on a cold and rainy weekend.


We recycle about 90% of our trash, in fact, we dropped trash pickup.
I have tubs on mounted brackets in the garage for glass, plastic, 
tin and aluminum cans.
We then drive it to the center where it is further broken down into
glass: clear, brown and green
plastics:  clear, translucent or colored
newspaper, magazines, etc.
The only things I can't recycle are lids and paper (packaging/paper towels, etc)
We burn the paper; however, our barrel needed replacing.


He purchased 1/8 inch plate steel, 
this is going to be more like a dumpster that can incinerate.
I need to keep the scavengers out so it must be sturdy and lockable. 


Lizzy the Cat supervises the activities- given her extensive welding experience.


They cut with the chop saw as well as the metal cutting band saw.


Helpful Neighbor, Rick, grinds parts to smooth out the pieces.


The X4000 begins to take shape


Inside welds- yes Helpful Neighbor does fit inside!


Working on the clean out trap which also functions as a damper
to draw air through the bottom and out the top for better burning.
Micro Brew beer must provide some very essential 
vitamins and minerals to enhance fabrication abilities.


Lock/Catch on the clean out trap/damper


Clean out trap opened.


They had me in mind when making the lid.
The steel is very heavy- about 30 lbs - so he made a slider with catches.
This will allow us to open the top for draw 
plus easy for me to throw trash in as the week progresses.


The handle remains cool, even if the fire is raging.
He fashioned this out of a welding hammer.


The lid is almost ready.


The catch makes certain it can't fall off when sliding open.


They carry it out for test run.


You can see why I need a new barrel, the side is out of this one.


The fire is lit- three trash bags of trash that have accumulated begin to burn.


Smokin!


You can see the fire through the open clean out door.
It's very, very hot.
Not too bad on this cold, rainy night.
We still need to paint it and put some bracing on the top so it won't bend when hot.

Cost  of materials
$130 for the steel
$70 misc items- 
$200 TOTAL
(he made use of items we already had so this cost is an estimate)
Trash Pickup $200 every year as of 2012
Life of this barrel -  a long time, perhaps decades!


Inspiration.
They celebrate their victory 
(in moderation)


The happy hubby- his goal accomplished.


The Helpful Neighbor
(Making a funny face for the camera)

Oh how happy to be trash free now!